How to send SMS or receive SMS from a Text file
This chapter explains how to install and configure Ozeki NG SMS gateway in order to be able to send and receive SMS messages from a txt file. You will be provided with step-by-step instructions on how to install and configure the File user, that makes this possible, along with explanations about the different file formats you can use to send and receive SMS messages with the File user.
When you install a File user, Ozeki NG - SMS Gateway will automatically create the incoming and the outgoing directory along with other directories for SMS messages related to the File user. These directories can be found in a collection directory named smsTemp by default. You can rename this collection directory and the subdirectories. However, make sure you specify them correctly for the File user in the respective edit boxes containing the paths in the General tab of the Configuration panel (see the Configuration section below).
You can use the graphical user interface of Ozeki NG - SMS Gateway to install and configure a File user.
Installation
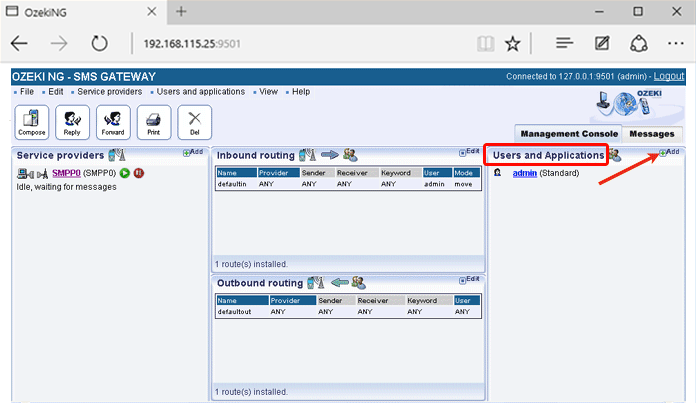
To start installing and configuring a File user, click the Add button in the top right-hand corner of the Users and Applications panel on the right of the Management Console. You can also add a user by clicking the Add user item in the Users and applications menu (Figure 1).
This will bring up an interface consisting of two panels.
- The panel on the left contains a list of users that have been installed. In the bar at the bottom of the panel you can read how many users have been installed.
- The panel on the right contains a list of users that can be installed.
- Each user in the left-hand panel is listed with a unique name (and the user type stated in brackets).
- Each user in the right-hand panel is listed with the name of its type and a brief description of what it can be used for.
To start installing a File user, click the Install link in the respective entry in the list (Figure 2).
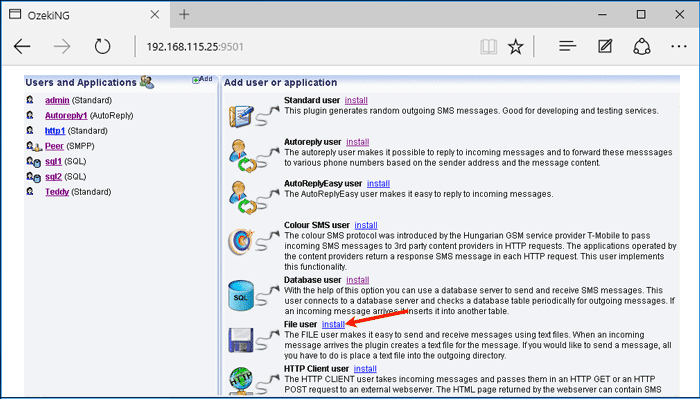
When installing a user (type), you need to give it a unique username. Clicking the Install link will bring up the File user installation panel. Here, you need to enter a unique username in the Username field.
General configuration
The General tab of the Configuration panel will show up after you have specified a unique username for the File user (Figure 3).
The upper section of the tab contains the File format dropdown menu. Select an appropriate file format: List, Simple or Verbose. (For more information, see the File formats section below.)
Below the File format dropdown menu, there is an edit box. In this, you can specify how often the program should check the outgoing directory for messages to send. Enter the number of seconds in numerical format, representing a positive whole number. If you are content with the default specification (every 10 seconds), leave the edit box unchanged.
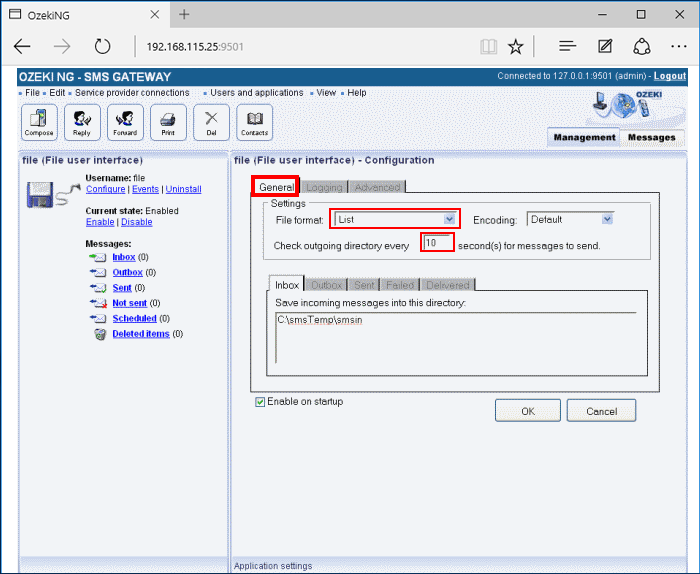
The lower section of the tab contains five edit boxes containing paths to directories. Each path includes a different subdirectory name. As mentioned above, the installation of the File user automatically creates different directories for messages. The status of a message defines which directory it can be found in. Each path leads to a directory containing messages of a specific status (Figure 4).
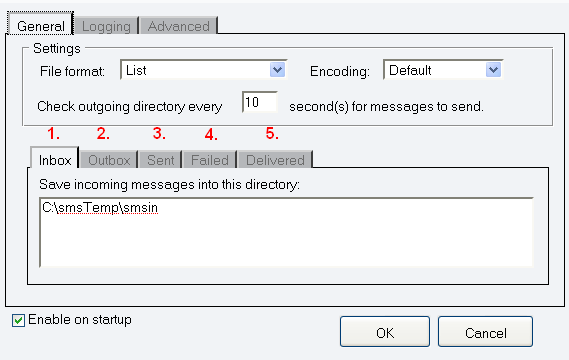
The first directory (INBOX) is for incoming messages, i.e., messages delivered to Ozeki NG - SMS Gateway and destined to the File user (according to inbound routing rules).
The second directory (OUTBOX ) is for outgoing messages, i.e., messages originated by the File user for Ozeki NG - SMS Gateway to send out (according to outbound routing rules).
The third directory (SENT) is for messages that have been successfully sent out and accepted by an SMS Centre for delivery.
The fourth directory (FAILED) is for messages that have failed to be sent out. These messages have not been accepted by the SMS Centre for delivery.
The fifth directory (DELIVERED) is for messages that have been delivered to the recipient phone. When Ozeki NG - SMS Gateway receives a delivery report from the SMS Centre, a sent message will be inserted into this directory.
Sending an SMS message
When you wish to send a message using the file plugin your application and the SMS engine will work on the same set of files. This cooperation can have conflicts if the same file is accessed by the SMS engine and your application at the same time. To avoid the possible conflicts, you can use a locking mechanism when you use the File API.
In the following example I will give you the steps you should take if you wish to send files using a safe way. (These steps are particularly important if you are using the network to put files to be sent into the SMSout directory. If you use FTP, NFS or Samba to access the remote directory make sure you follow these steps.)
To perform sending 4 directories are used:
- C:\smsTemp\smsout\ - the outgoing directory
- C:\smsTemp\smssent\ - the directory that holds the messages that were successfully sent
- C:\smsTemp\smsfailed\ - the directory that holds the messages that could not be sent.
- C:\smsTemp\smsdelivered\ - the directory that holds the messages that have arrived to the destination handset.
To send an SMS first you should create a "lock" file in the outgoing directory. A lock file is used to make sure the SMS Engine will not start to read the real file containing the messages while the file is still being written. The lock file is an empty file, that has a name that matches the real file. The lock file name has a special extension: .lock. This extension is appended to the end of the filename. After the lock file is created you can edit the real file containing the outgoing message text. When you are finished simply delete the lock file.
Step 1.) Create: C:\smsTemp\smsout\mysms.sml.lock
Step 2.) Create: C:\smsTemp\smsout\mysms.sml Write : C:/smsout/mysms.sml
Step 3.) Delete: C:\smsTemp\smsout\mysms.sml.lock
After you have created your file, you need to wait. The SMS Engine will delete your file and will try to send the messages. When the sending is done a new text file will be placed into the smssent or the smsfailed directory based on the sending results. When the file is created the same locking steps are performed.
Please take a look at the following diagram:
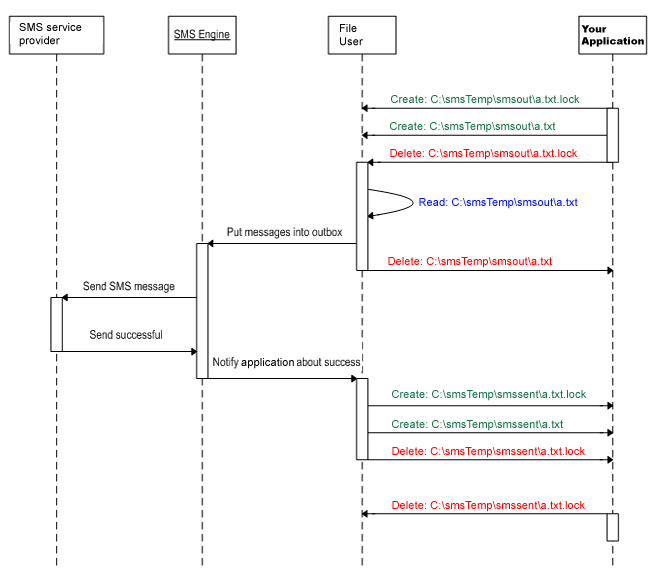
If the new text file is saved into the sent directory, it means the message was successfully delivered to the SMS network. If delivery reports are configured on the service provider connection configuration form and delivery reports are supported by the SMS service provider, you will receive a status report SMS when the SMS is delivered to the destination handset. If this happens, the SMS engine will create a text file with the same locking steps in the smsdelivered directory.
File formats
As mentioned above, Ozeki NG - SMS Gateway supports the following file formats: simple, verbose and list. You can use any of these formats to send a message. To select a particular format, use the configuration form of the file user.
The simple file format
If you select the simple file format in the dropdown menu (see Figure 3 above), each incoming message will be saved in a separate file. The name of the file is the sender phone number, and the only line of the file contains the message. For example:
c:\smsout\+36203105366
Hello world
To send messages using the simple file format, create a separate text file for each outgoing message and place these files into the smsout directory. The name of the text file has to be the recipient phone number. When the message has been sent out, the text file will be automatically deleted from the directory.
Note that if you want to send more than one message to the same recipient phone number, you can only place a new message into the outgoing directory if the previous message has been sent out and is no longer there. This is because you cannot have two files with the same name in the same directory. If the previously inserted file is still in the directory (has not yet been sent out), you can only insert the new file by overwriting the previous file. Therefore, if you insert a new file with the same name (which is the telephone number of the recipient) into the outgoing directory, your previous SMS message will not be sent out at all. This is because the file containing it will be replaced with a new one. Replacing the previous file is essentially equal to deleting it.
Accordingly, if you select the simple file format, an incoming message from a specific sender phone number will overwrite (delete) the previous message from the same number. Therefore, it is always only the latest message from a specific phone number that will be saved in the inbox. This may be inconvenient if you wish to save more than one SMS message from the same sender. Take this into consideration when you select the file format in the respective dropdown menu.
On the other hand, this file format may be convenient for position tracking SMS applications. The movement of vehicles can be tracked with a GSM device transmitting the vehicle's position coordinates via SMS to the File user of Ozeki NG - SMS Gateway. In this case, it may not be problematic (or it may even be desirable) that only the latest report is saved in the inbox.
The verbose file format
The verbose file format is similar to the simple file format inasmuch as each message resides in a separate file. The difference is that the file contains more information than just the message text. The main advantage of this file format is that you can place into the directory more than one file containing a message to the same destination (phone number). You can give each file any name, which has to be different from the name(s) of any other files(s). Note that the extension of the file has to be .sms .
The first line in the file has to contain the sender phone number, the
second line contains the recipient phone number, and the message text
follows these in the next line. For example:
c:\smsout\anyname.sms
+36203105366
+36209937723
The message text
The list file format
The list file format is a convenient way to send and receive a large number of SMS messages. In this case more than one message is stored in the same file.
For outgoing messages, you should create a text file in which each line contains a message with the recipient's phone number (in international format) before it. The phone number and the message text is separated by a space character. When the messages are ready to be sent, place the file into the outgoing (smsout) directory. The file name needs to have the .sml extension (sml stands for SMS list). For example:
c:\smsout\list.sml+36205555366 This is the first message +36209937723 This is the second message +36307789723 Use Ozeki NG - SMS Gateway!
You should place this text file into the c:tmpsmsout directory. For example, you can save it as "c:\tmp\smsout\mysms.txt"
The xml file format
The XML file format can also be used for sending SMS messages with Ozeki NG SMS Gateway. In this case you need to save the file in XML extension, and you should specify the XML file in the following format:
ORINIGATOR_NUMBER RECIPIENT_NUMBER Message text SMS:TEXT:FORMATTED
- Between Originator tags you can find the originator number.
- Between Recipient tags you can find the recipient number.
- Between Text tags you can find the text message.
- Between Time tags you can find the exact time when the message needs to be sent out.
Logging configuration
To configure logging related to the File user, click the Logging tab in the Configuration panel. The tab has a Logging and a Log file settings section. Here, you can choose whether to make the program write log entries about sent and received messages in human readable format and/or log file content.
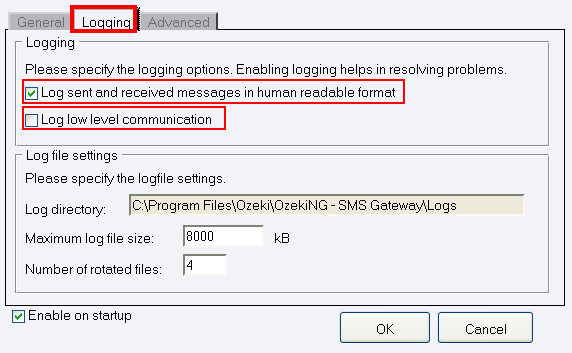
You should check one or both of the checkboxes, as logfiles can be useful in debugging communication problems (Figure 5).
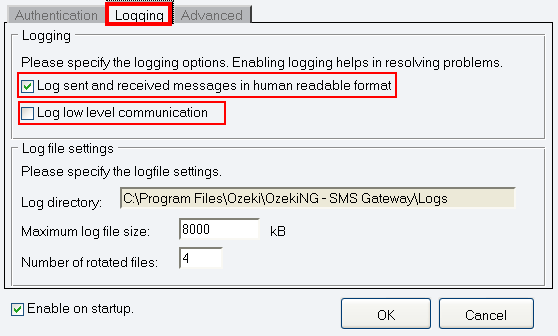
In the Log file settings section of the tab, you can make specifications for the size and the number of available logfiles. Log rotation saves disk space, as it ensures that older (and probably no longer needed) logfiles will be automatically deleted from the log directory, which is specified in the Log directory text box. By default, the path to the logfiles is: C:\Program Files\Ozeki\OzekiNG - SMS Gateway\Logs
In the Maximum log file size text box in the Logfile settings section, you can specify the maximum size of a logfile. Once this size is reached, a new logfile will be created. Specify the number of kilobytes for the size of a logfile by entering a positive whole number. By default, the maximum logfile size is 8000 kB.
In the Number of rotated files text box, specify the maximum number of rotated logfiles that are saved. Specify this number by entering a positive whole number. By default, the number of logfiles that are saved is 4 (see Figure 4 above).
If you are content with the default specifications, leave the text boxes unchanged.
In Advanced tab you can specify the phone number of the sender, and you can provide a username and a password to login. In the lower section of this tab you can enable Allow routing table override option. If routing table override is enabled, this user can specify the preferred service provider connection for each message. You can also enable accounting for this user option. If you enable accounting, a credit limit can be set for this user. The user will not be allowed to send more messages than the credit limit.
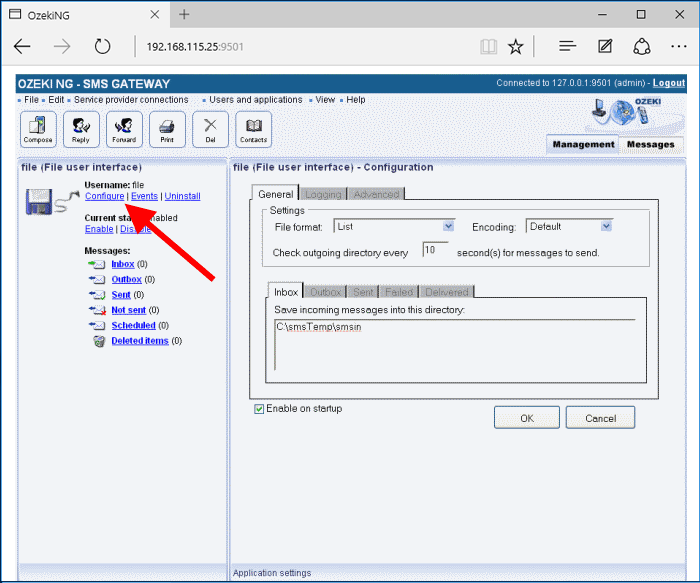
To modify the configuration or to view server events related to an installed user, open the panel of the user's account. To do this, click the name of the user in the Users and Applications panel of the Management Console. In the panel of the user's account, click the link of the task you wish to perform (Figure 6).
FAQs
What kind of number formats are available for SMS?
An SMS message consists of two essential numbers: the sender address and the
receiver address. Here are the details:
Sender Address:
The sender address can take any of the formats mentioned earlier (short
code, local number, international number, or long code).
It identifies the originator of the SMS message.
Receiver Address:
The receiver address can be one of the following:
- Short Code: A brief numeric code used for specific services or campaigns.
- Local Number: A phone number within the local area or country.
- International Number: A phone number from another country.
- Long Code: A regular phone number used for SMS communication.
- Alphanumeric addresses (e.g., using letters or symbols) are not supported for SMS messages.
What is a short code?
A short code is a compact numeric identifier typically consisting of 4 or 5 digits, such as the example you provided: 1544. These short codes are used primarily for SMS services that are widely advertised. A short code consists of digits only and is not preceded by a plus sign. Its primary advantage lies in its simplicity and ease of use. However, there is a significant drawback: short codes work only within the network of a single mobile operator or within a single country. If mobile network operators have allocated specific short code numbers among themselves, messages sent to short codes are routed accordingly. Short codes are not routed internationally. In summary, short codes offer simplicity but are limited in their reach. They serve specific purposes within localized contexts.
What is the local number format?
A number that does not start with a country code, e.g.: 06201234567
An SMS number specified in the local number format contains digits only and is not preceded by a plus sign. It often includes a network prefix that identifies the mobile network operator, but it does not contain a country code. This format is commonly used within a country to send SMS messages from one phone to another. Messages sent to telephone numbers specified in the local number format are not routed internationally.
What is international number format?
It starts with a plus sign and a country code, that is followed by a network prefix and the phone number itself. e.g.: +36201234567
The most widely used telephone number format starts with a plus sign followed by
a country code, a network prefix, and the phone number itself. For example:
+36201234567. A telephone number specified in the international number format
is routed internationally, allowing any mobile phone to be addressed this way.
When sending an SMS to a cell phone from abroad, it’s best to use the international
number format. For instance, to send an SMS to a U.S.A. mobile number from another
country, you would provide the cell phone number in international format:
+12143500649. The +1 represents the country code, 214 is the network prefix, and
3500649 is the phone number itself.
Funny, but people in the U.S. sometimes miss their country code while typing an SMS, leading
to amusing situations like typing +2143500649 instead of +12143500649!
What is a long code number?
A long code refers to a telephone number that is longer than the standard phone
number length within the network. For instance: +36201234567111111.
In this scenario, a freely defined postfix is appended to the phone number itself.
This feature is available in some networks only. It proves highly useful because
the postfix portion of the telephone number can be utilized to carry a unique
message ID, which applications can leverage. For example, if the base phone number
is +36201234567, and a message is sent to +36201234567111111 (where 111111 is the
postfix), the recipient can use this postfix to process the message content based
on the appropriate business logic.
Long code numbers are exclusively available on IP SMS connections (such as SMPP,
UCP, CIMD2). The GSM modem technology does not support this feature. If you use
a GSM modem, you can only receive messages on the appropriate MSISDN number.
What is the alphanumeric number format?
An alphanumeric sender address contains text instead of a phone number. For
example: ozeki.
When an SMS is sent from an IP SMS connection, the sender address can be freely
specified. You can define not only a telephone number but also a text-based
identifier. For instance, you could specify your nickname or the company name as
the message sender. Keep in mind that this message sender ID cannot exceed 11
characters when using an alphanumeric sender address. Additionally, the characters
must be Latin characters.
However, it’s important to note that if an SMS message is sent using an
alphanumeric sender address, the recipient of the message cannot reply to it
directly.
