How to send and receive SMS messages from FTP server
This page demonstrates how to install and configure Ozeki NG SMS Gateway to be able to send and receive SMS messages from an FTP server. Detailed instructions with screenshots will be provided on how to install and configure the FTP user and you will find further information on the various file formats that can be used, as well.
An FTP user is an application, that allows you to send and receive messages using text files. It works as follows: if there is an incoming message, the FTP user creates a text file for this message and places it into the incoming directory on the ftp server. To send out messages you need to place a text file into the outgoing directory on the ftp server. The FTP user will periodically check this outgoing directory on the ftp server for messages to be sent. If it finds messages, it will send out them as SMS messages. After sending out the messages, the FTP user place them into "Sent", "Delivered" or "Failed" folders according to their delivery status.
When you install an FTP user, Ozeki NG - SMS Gateway will automatically create the incoming and the outgoing directory along with other directories for SMS messages related to the user. These directories can be found in a collection directory named smsTemp by default. You can rename this collection directory and the subdirectories. However, make sure you specify them correctly for the FTP user in the respective edit boxes containing the paths in the General tab of the Configuration panel (see the Configuration section below).
You can use the graphical user interface of Ozeki NG - SMS Gateway to install and configure a FTP user.
Installation
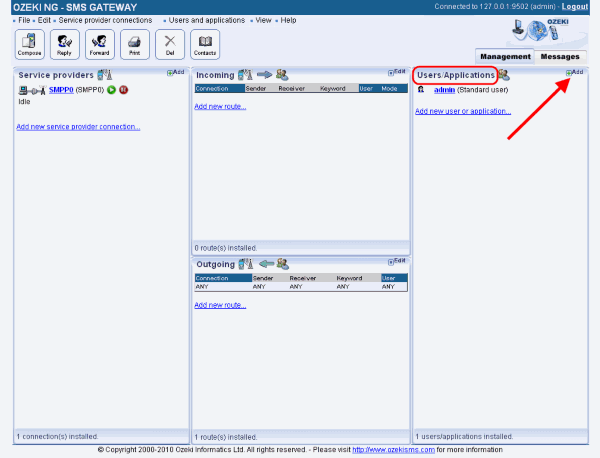
To start installing and configuring an FTP user, click the Add button in the top right-hand corner of the Users and Applications panel on the right of the Management Console. You can also add a user by clicking the Add user item in the Users and applications menu (Figure 1).
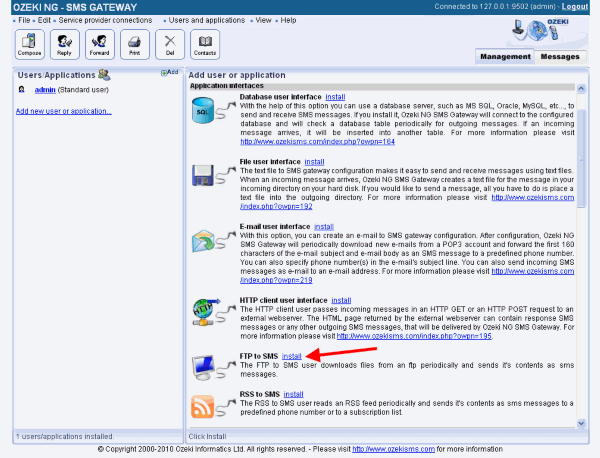
This will bring up an interface consisting of two panels. The panel on the left contains a list of users that have been installed. In the bar at the bottom of the panel you can read how many users have been installed. The panel on the right contains a list of users that can be installed. Each user in the left-hand panel is listed with a unique name (and the user type stated in brackets). Each user in the right-hand panel is listed with the name of its type and a brief description of what it can be used for.
To start installing a FTP user, click the Install link in the respective entry in the list (Figure 2).
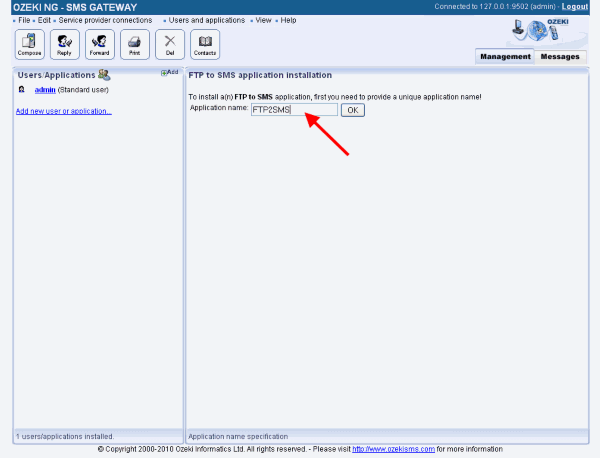
When installing a user (type), you need to give it a unique username. Clicking the Install link will bring up the File user installation panel. Here, you need to enter a unique username in the Username field (Figure 3).
General configuration
The General tab of the Configuration panel will show up after you have specified a unique username for the FTP user.
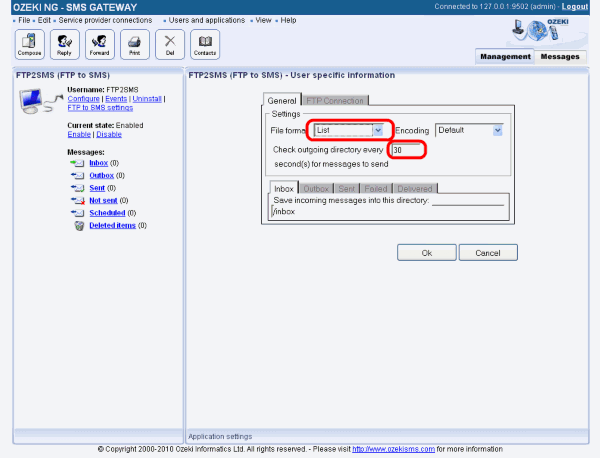
The upper section of the tab contains the File format dropdown menu. Select an appropriate file format: List, Simple or Verbose. (For more information, see the File formats section below.)
Below the File format dropdown menu, there is an edit box. In this, you can specify how often the program should check the outgoing directory for messages to send. Enter the number of seconds in numerical format, representing a positive whole number. If you are content with the default specification (every 30 seconds), leave the edit box unchanged (Figure 4).
The lower section of the tab contains five tabs containing paths to directories. Each path includes a different subdirectory name. As mentioned above, the installation of the File user automatically creates different directories for messages. The status of a message defines which directory it can be found in. Each path leads to a directory containing messages of a specific status (Figure 5).
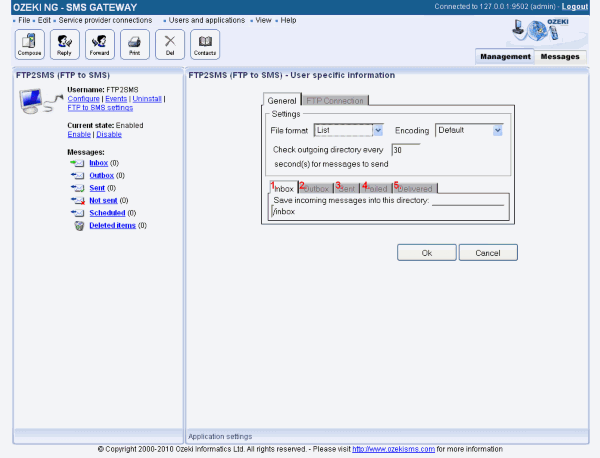
The first directory (INBOX) is for incoming messages, i.e., messages delivered to Ozeki NG - SMS Gateway and destined to the File user (according to inbound routing rules).
The second directory (OUTBOX ) is for outgoing messages, i.e., messages originated by the File user for Ozeki NG - SMS Gateway to send out (according to outbound routing rules).
The third directory (SENT) is for messages that have been successfully sent out and accepted by an SMS Centre for delivery.
The fourth directory (FAILED) is for messages that have failed to be sent out. These messages have not been accepted by the SMS Centre for delivery.
The fifth directory (DELIVERED) is for messages that have been delivered to the recipient phone. When Ozeki NG - SMS Gateway receives a delivery report from the SMS Centre, a sent message will be inserted into this directory.
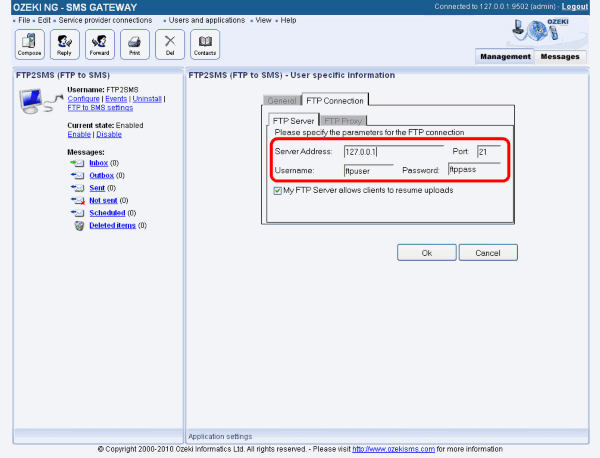
On FTP Connection tab you can find FTP server section. Here, you need to provide the IP address of the FTP server, the port, your username and password (Figure 6).
File formats
As mentioned above, Ozeki NG - SMS Gateway supports the following file formats: simple, verbose and list. You can use any of these formats to send a message. To select a particular format, use the configuration form of the file user.
The simple file format
If you select the simple file format in the dropdown menu (see Figure 3 above), each incoming message will be saved in a separate file. The name of the file is the sender phone number, and the only line of the file contains the message. For example:
c:\smsout\+36203105366Hello world |
To send messages using the simple file format, create a separate text file for each outgoing message and place these files into the smsout directory. The name of the text file has to be the recipient phone number. When the message has been sent out, the text file will be automatically deleted from the directory. Note that if you want to send more than one message to the same recipient phone number, you can only place a new message into the outgoing directory if the previous message has been sent out and is no longer there. This is because you cannot have two files with the same name in the same directory. If the previously inserted file is still in the directory (has not yet been sent out), you can only insert the new file by overwriting the previous file. Therefore, if you insert a new file with the same name (which is the telephone number of the recipient) into the outgoing directory, your previous SMS message will not be sent out at all. This is because the file containing it will be replaced with a new one. Replacing the previous file is essentially equal to deleting it.
Accordingly, if you select the simple file format, an incoming message from a specific sender phone number will overwrite (delete) the previous message from the same number. Therefore, it is always only the latest message from a specific phone number that will be saved in the inbox. This may be inconvenient if you wish to save more than one SMS message from the same sender. Take this into consideration when you select the file format in the respective dropdown menu. On the other hand, this file format may be convenient for position tracking SMS applications. The movement of vehicles can be tracked with a GSM device transmitting the vehicle's position coordinates via SMS to the File user of Ozeki NG - SMS Gateway. In this case, it may not be problematic (or it may even be desirable) that only the latest report is saved in the inbox.
The verbose file format
The verbose file format is similar to the simple file format inasmuch as each message resides in a separate file. The difference is that the file contains more information than just the message text. The main advantage of this file format is that you can place into the directory more than one file containing a message to the same destination (phone number). You can give each file any name, which has to be different from the name(s) of any other files(s). Note that the extension of the file has to be sms. The first line in the file has to contain the sender phone number, the second line contains the recipient phone number, and the message text follows these in the next line. For example:
c:\smsout\anyname.sms+36203105366 +36209937723 The message text |
The list file format
The list file format is a convenient way to send and receive a large number of SMS messages. In this case more than one message is stored in the same file. For outgoing messages you should create a text file in which each line contains a message with the recipient's phone number (in international format) before it. The phone number and the message text are separated by a space character. When the messages are ready to be sent, place the file into the outgoing (smsout) directory. The file name needs to have the .sml extension (sml stands for SMS list). For example:
c:\smsout\list.sml+36205555366 This is the first message +36209937723 This is the second message +36307789723 Use Ozeki NG - SMS Gateway! |
You should place this text file into the c:tmpsmsout directory. For example, you can save it as "c:\tmp\smsout\mysms.txt"
