Send SMS messages from Microsoft SQL Server
In this chapter you can learn how to send and receive SMS messages using the Microsoft SQL database server. The solution uses the Ozeki NG - SMS Gateway software installed on your PC. The solution uses the following database connection string to connect to the database server:
Connection string type:
| OleDb |
| Provider=SQLNCLI;Server=YourServer;Database=YourDatabase; MultipleActiveResultSets=True;UID=YourUsername;PWD=YourPassword; |
Here is a quick overview of how this solution is going to work: First you create two database tables: ozekimessageout and ozekimessagein in MS SQL. Then you install and configure Ozeki NG SMS Gateway, to connect to MS SQL and to use these database tables for sending and receiving messages. Once you have the configuration completed, you can send an SMS message by creating a record in the ozekimessageout database table using an SQL INSERT. Ozeki NG will read this record using an SQL SELECT and will send your SMS message using a GSM modem attached to the PC or using an IP SMS connection.
Step 1 - Create your database tables in Microsoft SQL Server
MS SQL create table script:
CREATE TABLE ozekimessagein (
id int IDENTITY (1,1),
sender varchar(255),
receiver varchar(255),
msg nvarchar(160),
senttime varchar(100),
receivedtime varchar(100),
operator varchar(30),
msgtype varchar(30),
reference varchar(30),
);
CREATE TABLE ozekimessageout ( id int IDENTITY (1,1), sender varchar(255), receiver varchar(255), msg nvarchar(160), senttime varchar(100), receivedtime varchar(100), operator varchar(100), msgtype varchar(30), reference varchar(30), status varchar(30), errormsg varchar(250) ); |
If you want to work with larger messages, you can increase the size of the msg field, or you may also change its data type.
You can optionally create an index in the database for the 'id' field of the outgoing SMS table to support SQL updates.
If you experiencing trouble connecting to the database server, from Ozeki NG SMS Gateway, you might need to allow TCP/IP login in MS SQL Server. The following webpage gives information about this: How to change the login method to allow TCP/IP connections for MS SQL server.
Step 2 - Create an SQL User in Ozeki NG
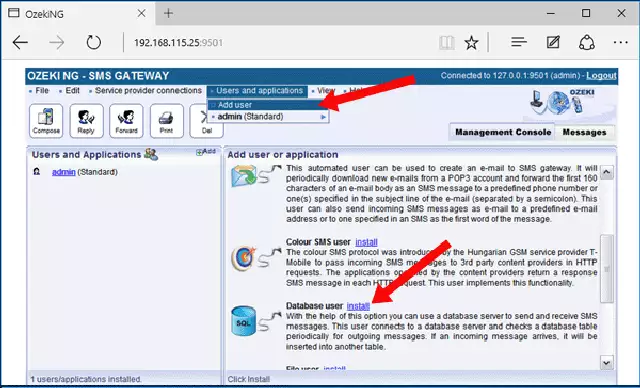
To do this you have to Download and Install Ozeki NG SMS Gateway. After installation you have to log into the SMS gateway using an Internet Explorer (or Firefox) Browser by typing http://127.0.0.1:9501/ and supplying admin as the login name and abc123 as the password. (Hint: do not forget to change your password!). After login, go to the "Users and Applications/Add User" menu item and click on Install next to the database user (Figure 2).
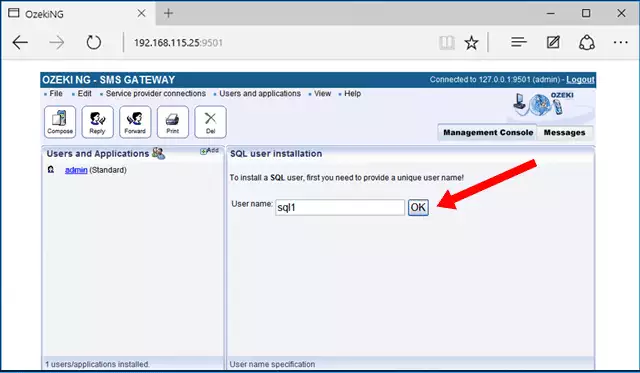
The last step of the installation is to enter a name for this user. For example, enter sql1 (Figure 3). You can type any name here.
Step 3 - Configure the database connection for this SQL User in Ozeki NG
Ozeki NG uses an ADO/OleDB connection to access you SQL Database server. To setup this connection selects OleDb as the connection type and enter the following connection string into the connection string textbox.
Connection string:Provider=SQLNCLI;Server=YourServer;Database=YourDatabase;UID=YourUsername;PWD=YourPassword;
Please note, that you must modify the variables in the connection string according to your system.
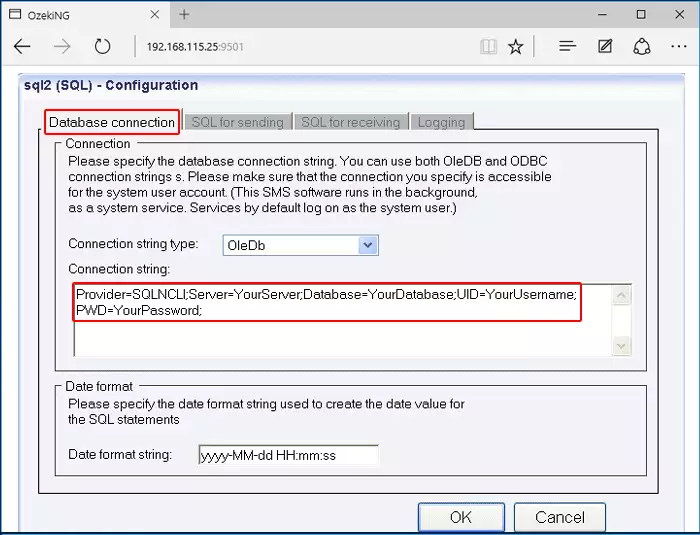
After you have configured the SQL connection string, click OK. By clicking OK Ozeki NG SMS Gateway will try to connect to your database server. You can verify the connection results in the events form. The events form can be accessed by clicking on the appropriate link (Figure 5).
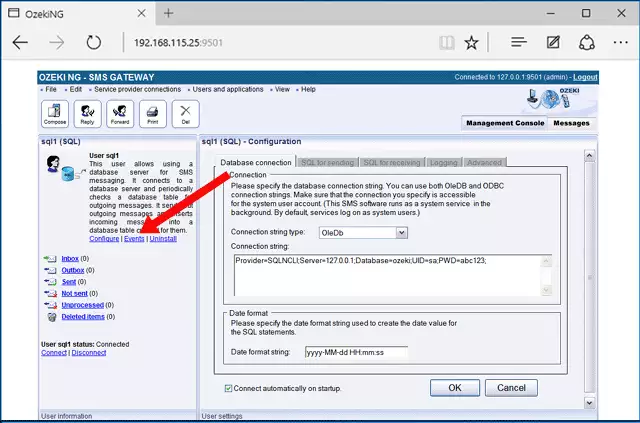
If the connection is successful, you can send an SMS message by placing a record into the ozekimessageout database table.
Step 4 - Enable detailed SQL login
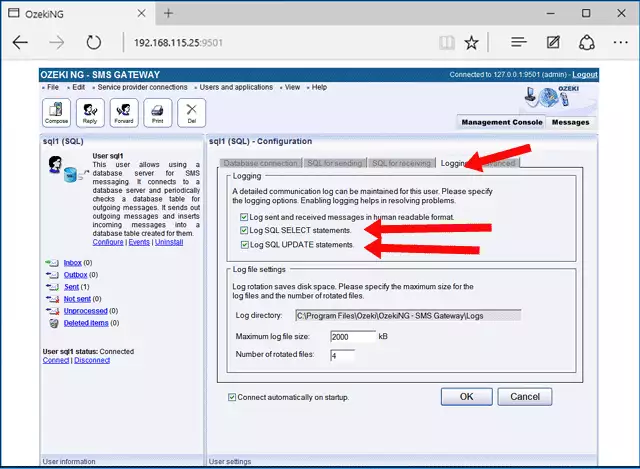
At this point you are ready to send your first SMS, but before you do, you should enable SQL logging to see what the SMS Gateway is doing to get your message. You can enable SQL logging on the Logging tab of the SQL User configuration form (Figure 6).
Step 5 - Send your first SMS message
To send your first SMS message you should insert a record into the ozekimessagout database table using the following SQL command:
insert into ozekimessageout (receiver,msg,status) values ("+44111223465","Hello
world","Send");
|
Step 6 - Check the logs in Ozeki NG
After you have inserted the record into the database, you should be able to verify that Ozeki NG has picked up the message for sending. You can do this by taking a look in the events form of the user (Figure 7).
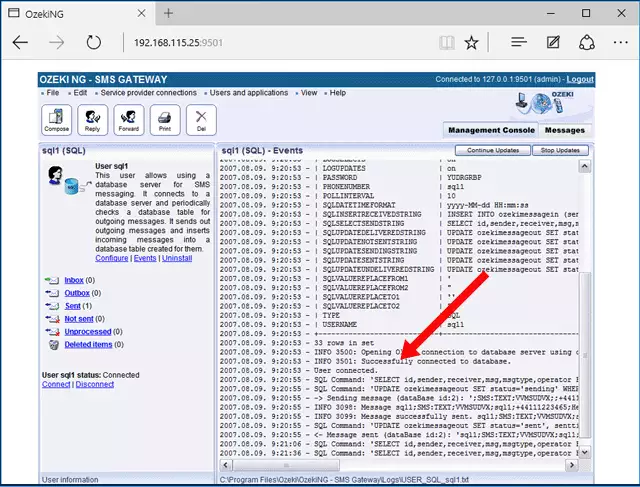
If everything goes well, you should see the following entries in the log:
2007.08.09. 9:20:53 - INFO 3500: Opening OleDb connection to database server using connection string ... 2007.08.09. 9:20:53 - INFO 3501: Successfully connected to database. 2007.08.09. 9:20:53 - User connected. 2007.08.09. 9:20:55 - SQL Command: 'SELECT id,sender,receiver,msg,msgtype, operator FROM ozekimessageout WHERE status='send'' returned 1 rows. 2007.08.09. 9:20:55 - SQL Command: 'UPDATE ozekimessageout SET status='sending' WHERE id='2'' affected 1 row. 2007.08.09. 9:20:55 - -> Sending message (dataBase id:2): '; SMS:TEXT;VVMSUDVX;;+44111223465;Hello world;' 2007.08.09. 9:20:55 - INFO 3098: Message sql1;SMS:TEXT;VVMSUDVX; sql1;+44111223465;Hello world; accepted for delivery from user 'sql1'. 2007.08.09. 9:20:55 - INFO 3099: Message successfully sent. sql1; SMS:TEXT;VVMSUDVX;sql1;+44111223465;Hello world; 2007.08.09. 9:20:55 - SQL Command: 'UPDATE ozekimessageout SET status='sent', senttime='2007-08-09 09:20:56' WHERE id='2'' affected 1 row. 2007.08.09. 9:20:55 - <- Message sent (dataBase id:2): 'sql1;SMS:TEXT;VVMSUDVX;sql1;+44111223465;Hello world;' |
