HTTP Server Connection
This chapter provides detailed instructions on how to install and configure the HTTP Server connection for SMS messaging using the Ozeki NG - SMS Gateway software.
As you can read on the Service Provider Connections page, you need to install and configure one or more service provider connections for SMS messaging using Ozeki NG - SMS Gateway. One of the service provider connections supported by the software is the HTTP Server connection.
The HTTP Server protocol makes it possible for service providers to pass incoming messages to your service using an HTTP request for each incoming SMS message and they optionally accept a reply message in the HTTP response. This technology is often used by premium-rated SMS services. This connection option can also be used as a "Virtual phone" for software development purposes.
You can install and configure the HTTP Server connection using the graphical user interface of Ozeki NG - SMS Gateway. To start installing and configuring an HTTP Server connection, click the Add button in the top right-hand corner of the Service providers panel on the left of the Management Console interface. (To find out how to open this interface, check out the QuickStart Guide.)
You can also add a service provider connection by clicking the Add service provider item in the Service providers menu.
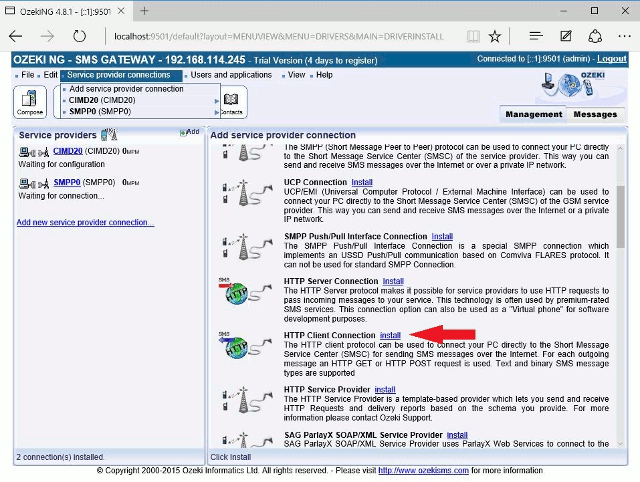
After you have clicked one of these, the Add service provider panel will show up on the right of the interface. The panel contains a list of protocols you can install and use for communication with an SMS service provider.
To select the HTTP Server protocol, click the Install link in the respective entry in the list (Figure 1).

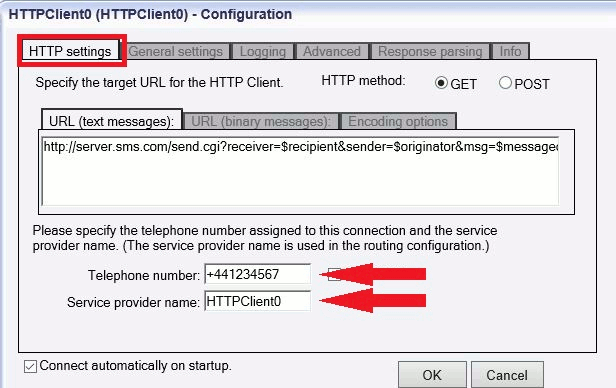
When you have installed the HTTP Server protocol, the Configuration panel will show up on the right of the interface. The first tab of the panel is the HTTP settings tab, which consists of a Connection and an Identification section.
In the Connection section, specify the HTTP Server settings. This information is provided by the SMS service provider when you subscribe to the service (Figure 2).

In the Base URL template, specify the base URL.
In the Identification section, specify the telephone number assigned to this connection and the service provider connection name. To facilitate identification and to avoid confusion, you should name the connection after the GSM service provider. E.g., if you have set up an HTTP Server connection with Vodafone, it is advisable to name it "Vodafone". Also, note that different connections should be given different names. If you have different connections from the same service provider, you can use different but similar names for them, e.g.: "Vodafone1", "Vodafone2" (or something of the like). However, some load balancing solutions require an identical name for different connections. For details, visit the Load Balancing and the Load Balancing for SMPP v3.3 page.
Enter the information in the respective edit boxes. Remember to enter the phone number in international format: starting with "+". You can check the overridable checkbox to the right of the Telephone number edit box. This ensures that you can replace the phone number specified in the Telephone number edit box with a different one to be displayed as the sender of an outgoing message. You can also replace the number with (alphanumeric) text consisting of a maximum of eleven (11) characters. Therefore, when a message is sent out, e.g. using the Database user, you can specify any different phone number or a name to be displayed as the sender of the message.
Note that the phone number to be specified in the Telephone number edit box is a mandatory value. If you leave the edit box blank, the sending will be unsuccessful.
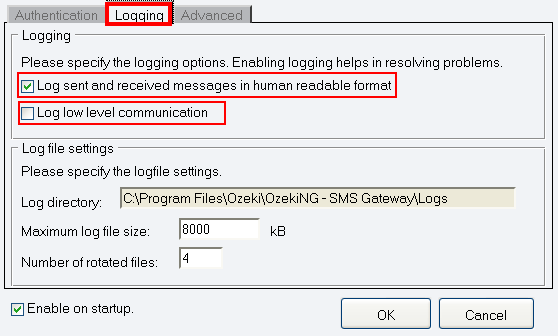
To configure logging, click the Logging tab in the Configuration panel. The tab has a Logging and a Log file settings section. Here, you can choose whether to make the program write log entries about sent and received messages in human readable format and/or log low level communication. Choosing the latter option will make the program produce logfiles containing binary codes representing the communication data. You should check at least the Log sent and received messages in human readable format checkbox, as logfiles can be useful in debugging communication problems (Figure 3).

In the Log file settings section of the tab, you can make specifications for the size and the number of available logfiles. Log rotation saves disk space, as it ensures that older (and probably no longer needed) logfiles will be automatically deleted from the log directory, which is specified in theLog directory text box. By default, the access path to the logfiles is: C:\Program Files\Ozeki\OzekiNG - SMS Gateway\Logs
In the Maximum log file size text box, you can specify the maximum size of a logfile. Once this size is reached, a new logfile will be created. Specify the number of kilobytes for the size of a logfile by entering a positive whole number. By default, the maximum logfile size is 8000 kB.
In the Number of rotated files text box, specify the maximum number of rotated logfiles that are saved. Specify this number by entering a positive whole number. By default, the number of logfiles that are saved is 4 (see Figure 3 above).
The Configuration panel for service provider connections contains a Connect automatically on startup checkbox (in the bottom left-hand corner). If it is checked, Ozeki NG - SMS Gateway will automatically initiate a connection with the SMS Centre when the program has started. If this checkbox is not checked, the connection has to be initiated manually.
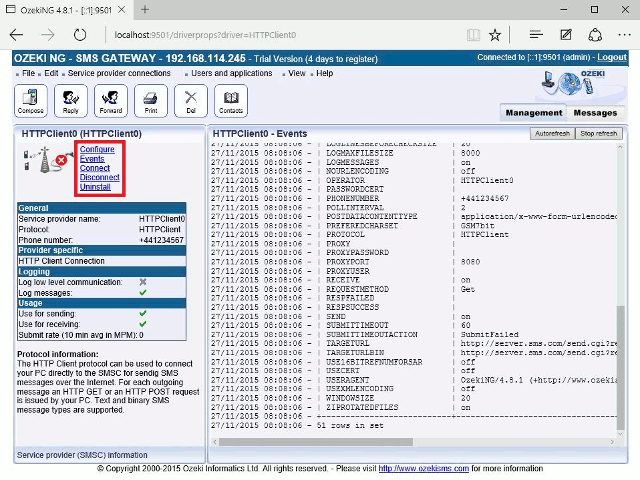
To initiate the connection manually, click the Connect link in the panel of the service provider connection (Figure 4).

You can open the panel of a service provider connection by clicking its name in the Service providers panel in the Management Console.
The panel of a service provider connection consists of three sections.
- In the upper section you can find the name of the service provider connection (with the name of its protocol in brackets).
- You can see an icon showing if the service provider connection is connected. If it is not, the icon is marked with an "x"
To the right of the icon, you can find links to perform different operations.
- Configure: to configure or modify the configuration of an installed service provider connection. Clicking this link will take you back to the Configuration panel.
- Events: to view the logging of the latest server events related to the service provider connection. Clicking it will bring up the Events panel containing the logging of the latest server events.
- Connect: to connect the service provider connection with the SMS Centre.
- Disconnect: to disconnect the service provider connection from the SMS Centre.
- Uninstall: to uninstall the service provider connection.
In the middle section of the panel, you can see some of the most important configuration information.
- The options that have been (re)activated during the configuration are marked with a tick.
- The options that have not been activated or those that have been deactivated during the configuration are marked with an "x".
In the lower section of the panel of the service provider connection you can read some information about its protocol.
